tp
Developer Guide
Introduction
 __  __           _   __  __
|  \/  |         | | |  \/  |
| \  / | ___   __| | | \  / | __ _ _ __
| |\/| |/ _ \ / _  | | |\/| |/ _  |  _ \
| |  | | (_) | (_| | | |  | | (_| | | | |
|_|  |_|\___/ \__'_| |_|  |_|\__'_|_| |_|
ModMan, short for Module Manager, is a desktop app designed to help Teaching Assistants (TAs) manage their module(s). It is optimized for use via a Command Line Interface (CLI). ModMan helps to track module details as well as students’ progress and data, all in one platform. It can also perform autograding for MCQ assignments.
About this Developer Guide
This developer guide details how ModMan is designed, implemented and tested. Readers can find out more about the overall architecture of ModMan, and also the implementation behind various functionalities. Technically inclined readers may wish to use the developer guide and further implement features or customise ModMan for their own use!
How to use the Developer Guide
The Developer Guide has been split into clear sections to allow readers to quickly navigate to their desired information.
- You may navigate to any section from the Table of contents.
- Click here for the Setting Up section and get started as a developer!
- Alternatively, if you wish to dive right into ModMan's implementation, we would recommend starting in the Design section.
Table of contents
Setting Up
You may follow this Setting Up guide and get started as a developer! This guide helps you import ModMan onto IntelliJ IDEA, but feel free to use your preferred IDE.
- Ensure you have Java 11 installed on your computer or install it from here.
- Fork the ModMan repository from here.
- Clone your fork to your local machine, using the Git software you prefer.
- Open IntelliJ IDEA; you may download it from here first.
- Import the cloned repository as a Gradle project.
- To ensure everything is working correctly, you may right click the
ModMan.javafile and selectRun Modman.main(). You can also test some of ModMan's commands.
For readers who are not familiar with the commands of ModMan, they can access the User Guide here.
Design
This section describes the four architecture components of ModMan, as well as the connections between them. The overall architecture of ModMan is explained first, before diving into each of the architecture components.
Architecture
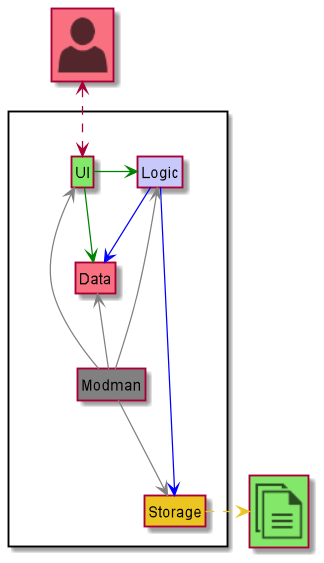
The Architecture Design given above explains the high-level design of ModMan. Given below is a quick overview of each component.
Modman is the main class of the application, and handles the app launch,
initializing the appropriate classes to be used.
The rest of the app consists of four components:
- Logic
- UI
- Storage
- Data
How the four architecture components interact with each other and the ModMan class
The Sequence diagram below shows the interaction between components for when the user issues the command add module CS2113T
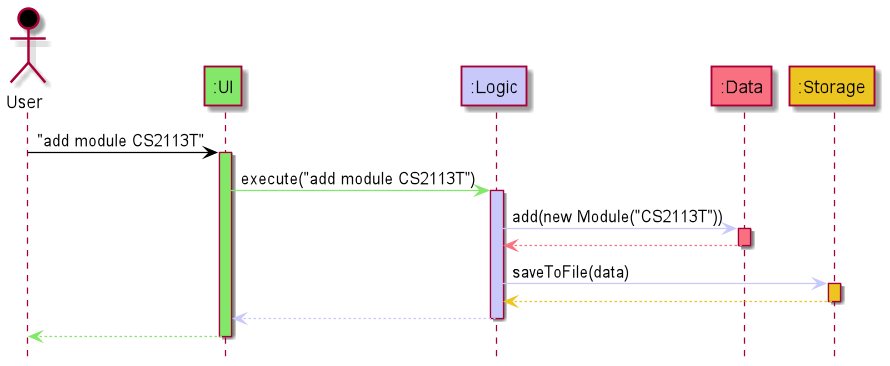
The sections below give more details of each component.
Logic Component
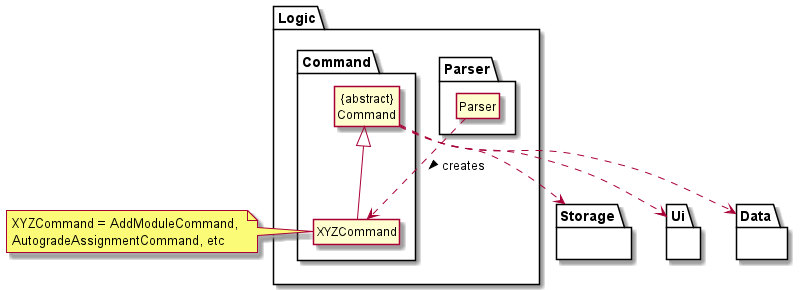
-
Logicuses theParserclass to parse the user command. - This creates a
Commandobject which is executed inModman. - The command execution can affect the state of the
DataandStoragecomponents. For example, theAddModuleCommandadds a newModuleobject inData. - The
Commandobject can also instruct theUito list and display information to the user.
Given below is the sequence diagram for creating the corresponding Command object from the user input via Parser.
The sequence diagram also acts as a reference frame for getCommand which is common across most Command objects.
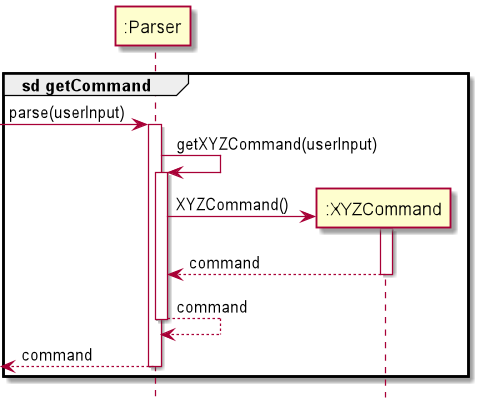
If a Command object does not use the reference frame, another sequence diagram would be used to describe how the Command object was created.
UI Component
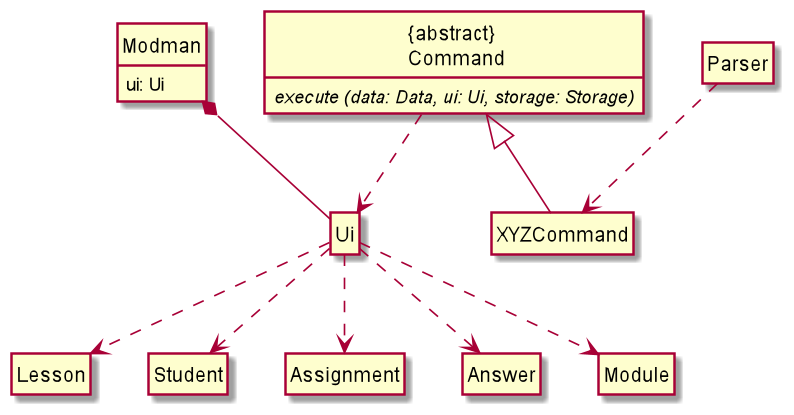
The UI Component consists of one class - Ui which provides all the functions
required to print different kinds of messages on the console.
-
Uiis class with aScannerobject that reads input from console. -
ModmanhasUiobject as an attribute which is instantiated when we enter the program. -
Uiobject reads input from screen and returns it which will then be passed to theParserso that it can parse the command. -
Commandis an abstract class that has multiple derived command classes that implement the abstract methodexecute. - Depending on the parsed user input, a command class object is created and the corresponding
execute()method runs. It acceptsUiobject as a parameter and calls the relevantUimethods that prints the specific messages. - Each
Uimethod has different parameters such asLesson,Student,Assignment,Answer,Moduleobjects which form dependencies betweenUiand these classes.
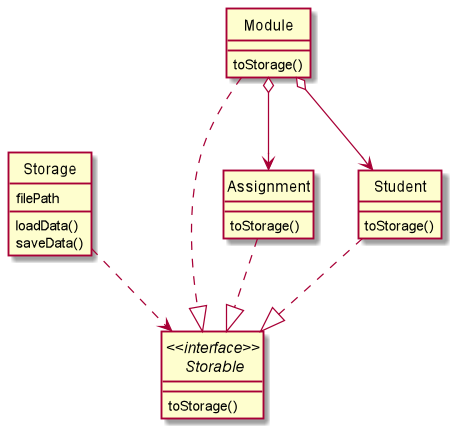
Storage Component
For the Storage functionality of the application, I have added a new Storable interface that is implemented by the three main entities of the app: Assignment, Student and Lesson. The Storable interface mandates the user to write a toStorage() method in order to be stored in the database. The toStorage() method converts all information of an object into a String format to be appended onto the database.
The implementation of the Storable interface helps to decouple the Storage class from all classes that require storing of their instances into the database. This is because by implementing Storable, all Storage class needs to do to store an object information into the database would be to interact with the Storable interface via the toStorage() method.
Given below is the Class Diagram for the Storage class. The storage class interacts with the Database file, ensuring that user's data will be saved at the end of each session and loaded up upon the user's next visit.
The Storage class is used to interact with the database.txt file. The loadData() function of the Storage object will be called at the start of the program and saveData() at the end of the program.
loadData():
The loadData() method is illustrated in the sequence diagram below.
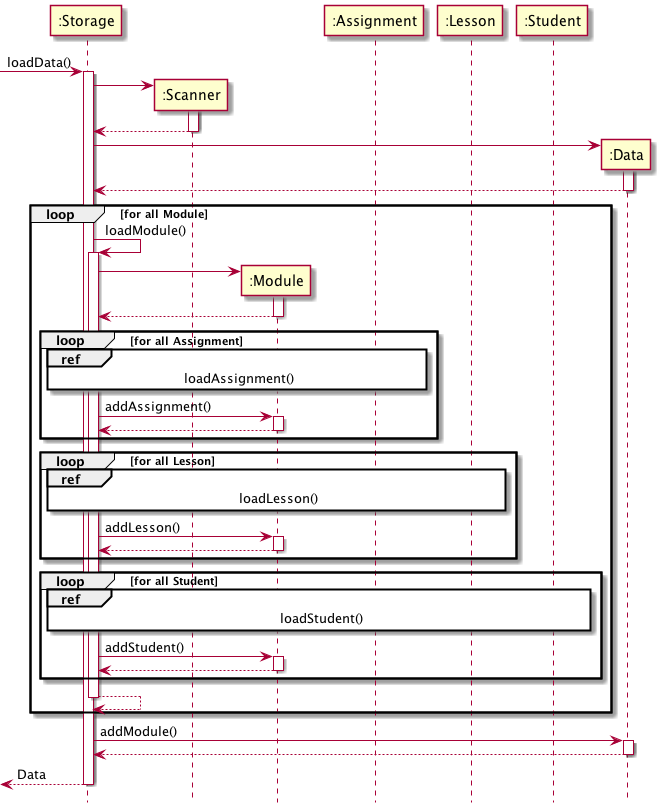
As can be seen, multiple loops are required to load all the information of each object instance from the Database so that the user's data can be retrieved fully.
saveData():
When the saveData() method is called, the toStorage() method of each object instance implementing the Storable interface will be called. The return string of each toStorage() method will then be appended onto the database.
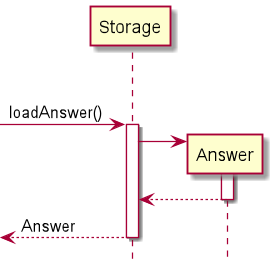
loadAnswer():
For Autograding purpose, the Storage class is required to retrieve the answers and students' scripts from the respective .txt files that they were stored in. The loadAnswer() method in the Storage class fulfils this. The Sequence Diagram below exhibits the behaviour of the loadAnswer() method.
loadScript():
Similarly to loadAnswer() as shown in the above Sequence Diagram, the loadScript() method follows the same logic in retrieving each student's script from their input file, scanning them as Data and allowing us to perform Autograding.
Database Failure:
The database should not be tampered with by the user. If the user opens up Database.txt and edits its contents, the data will likely be corrupted. In such cases, the program will fail upon starting, prompting the user to delete Database.txt before running the program again.
Data Component
The figure below shows the classes in ModMan that tracks module information data.
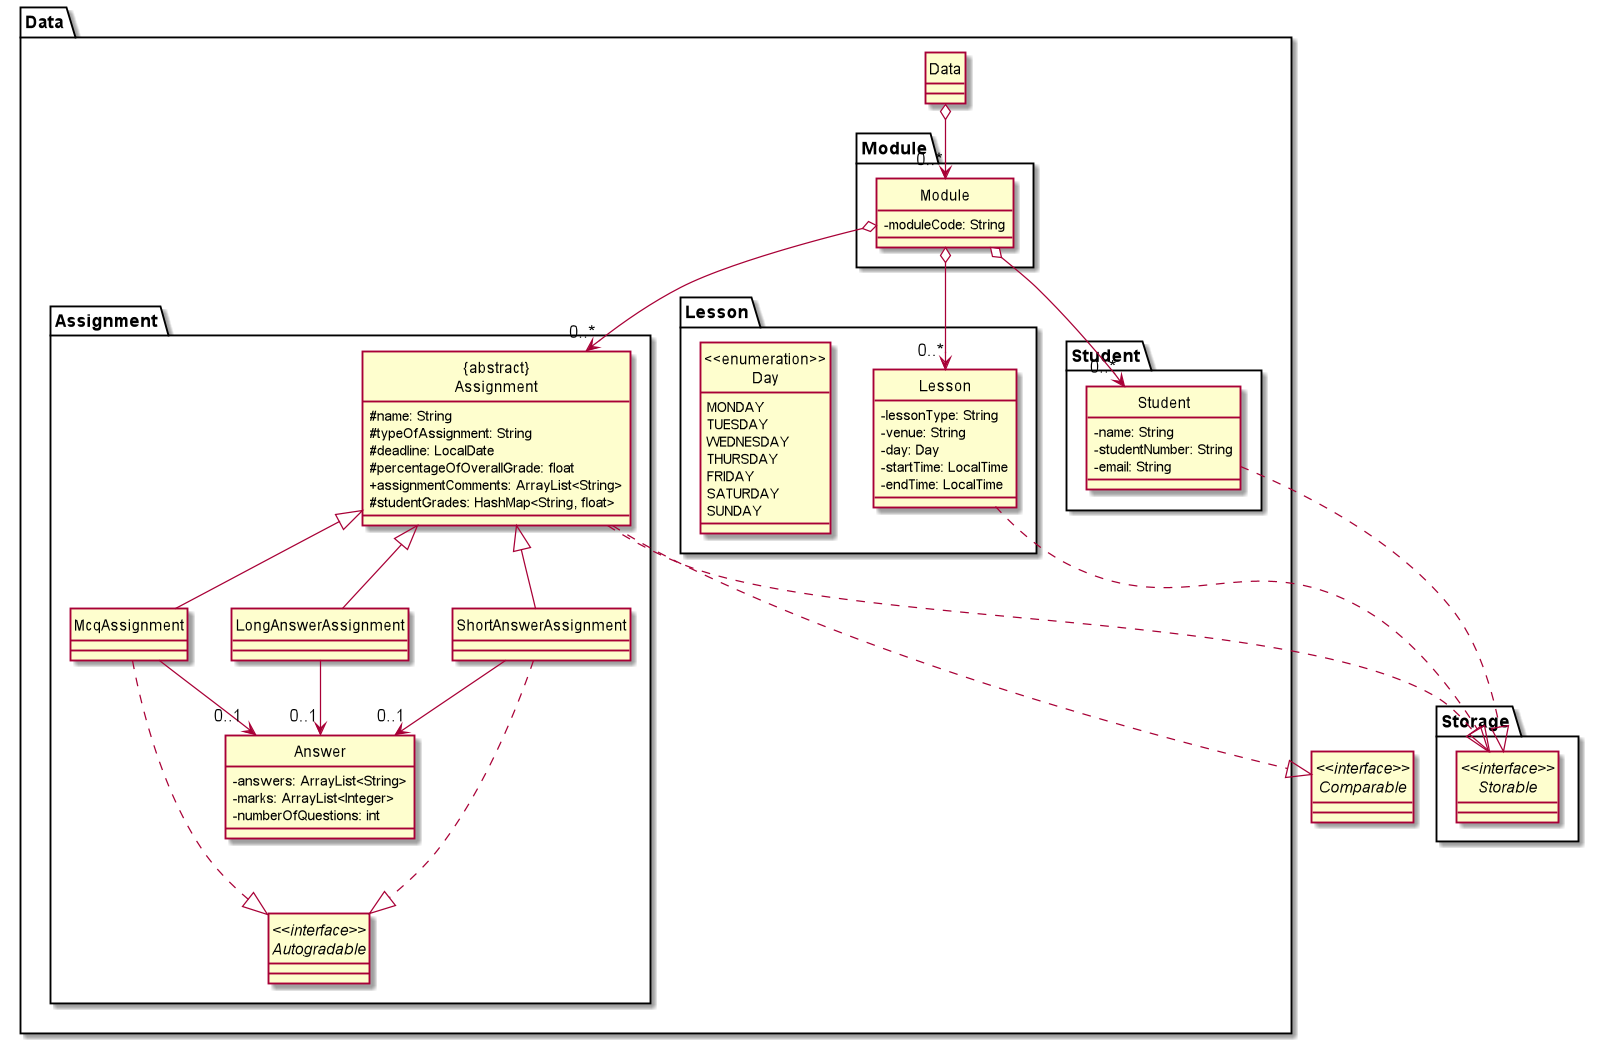
The Data,
- Stores
Moduleobjects that represents the modules. - Each
Modulecontains the details ofLessonandStudentobjects which implements theStorableinterface, as well as abstractAssignmentobjects which implement theStorableandComparableinterfaces.
Implementation
Editing Assignment Information
This subsection provides details on the implementation of the various commands that modify the Assignment object.
There are 4 attributes of the Assignment object in which the User can interact with:
- Deadline -
LocalDaterepresenting the date which the assignment should be graded by. - Percentage -
floatof the percentage of the overall grade which the assignment carries in the module. - Students' Grades -
HashMap<String, Float>of the students' grades for the assignment, where the key is the Student/Matric Number and the value is the Grade out of 100%. - Comments -
Stringrepresenting comments for particular questions and/or the overall assignment.
SetAssignmentDeadlineCommand
The SetAssignmentDeadlineCommand is used to set or update the deadline which the Assignment has to be graded by.
The deadline can then be used to sort the assignments based on the urgency of the grading.
Given below is the sequence diagram for the SetAssignmentDeadlineCommand:
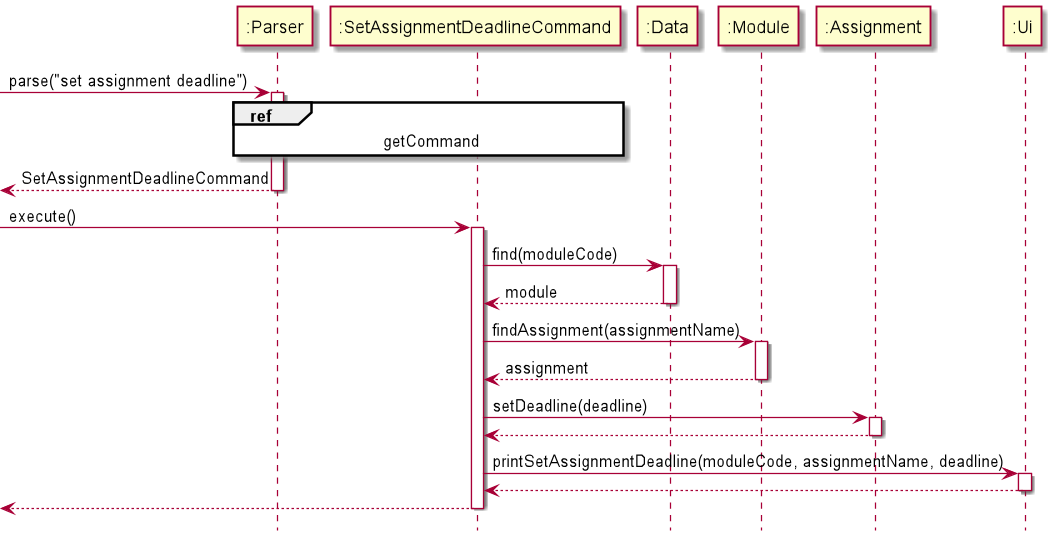
deadline passed into the setDeadline() function is of type LocalDate
|
|---|
Implementation considerations for using LocalDate for deadline attribute in Assignment:
-
LocalDateis an immutable class that represents dates with a default format of yyyy-MM-dd -
LocalDateallows for standardisation of the format and representation of deadlines -
LocalDatehas a built-in compareTo() method that allows us to compare and order two dates -
LocalDateallows us to easily sortAssignmentobjects by their deadline attribute
SetAssignmentGradeCommand
The SetAssignmentGradeCommand is used to set or update the grade of the Assignment for a Student. This can be used to track individual grades for each student.
Given below is the sequence diagram for the SetAssignmentGradeCommand:
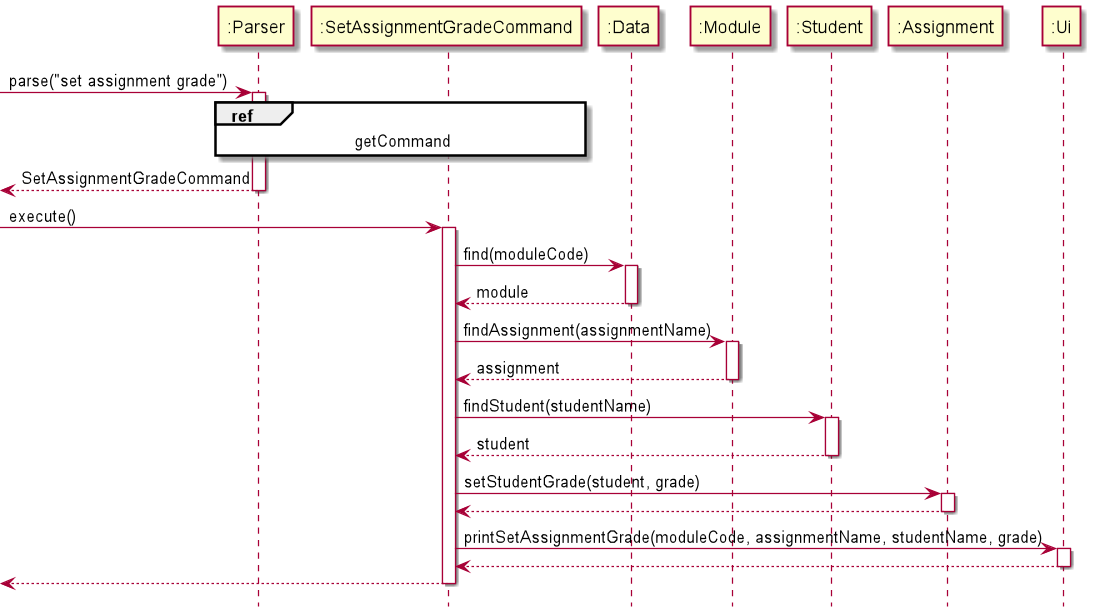
Implementation considerations for using HashMap<String, Float> to store students' grades:
-
HashMapallows for easy storage of "key/value" pairs, with thestudentNameandgradecorresponding to key and value respectively -
HashMaphas worst case get/put complexity ofO(logn), which offers decent time complexity performance when setting and retrieving thegrade-
HashMapmay have even better performance with a good hash
-
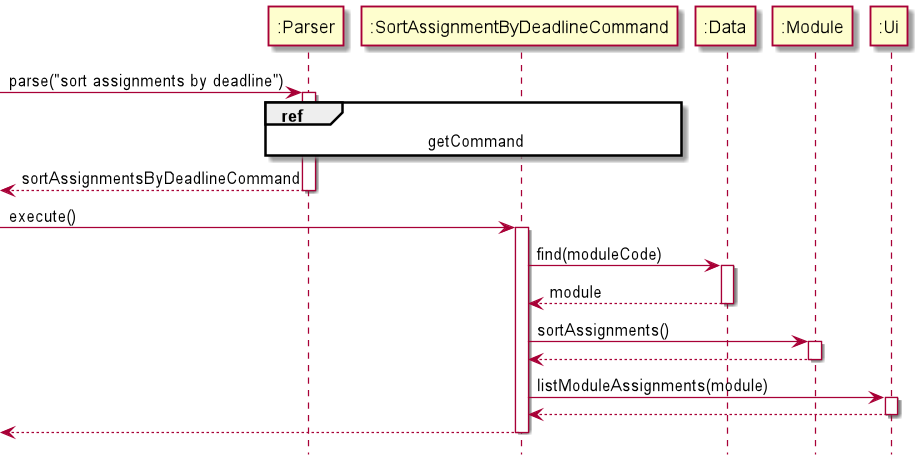
Sorting Assignments by Deadline
The SortAssignmentByDeadlineCommand is used to reorder the ArrayList of Assignment objects stored in the current Module.
The Assignment objects will be sorted based on their deadline attribute, which is of type LocalDate.
The deadline of an Assignment object can be null, in which case the Assignment will be sorted after other Assignment objects with valid LocalDate deadlines.
The sorting is also stable, and will retain the initial order of when the Assignment was added to the Module.
The code snippet for the compareTo() function which allows Assignment to implement the Comparable interface is as follows:
    @Override
    public int compareTo(Assignment other) {
        if (this.getDeadline() == null && other.getDeadline() == null) {
            return 0;
        } else if (this.getDeadline() == null) {
            return 1;
        } else if (other.getDeadline() == null) {
            return -1;
        }
        return this.getDeadline().compareTo(other.getDeadline());
    }
Modifying the compareTo() function allows you to easily change the natural ordering of the objects of the Assignment Class. Other attributes can also be added to Assignmentobjects in the future to be used for comparing. |
|---|
Given below is the sequence diagram for the SortAssignmentsByDeadlineCommand:
Autograding Assignments
The AutogradeAssignmentCommand is used to grade all current students' scripts found in the scripts directory.
The grades for each student will also be automatically saved and updated in the Assignment.
Autograding also keeps track of which students in the current student list have not submitted their assignment.
Currently, only the McqAssignment and ShortAnswerAssignment implement the Autogradableinterface |
|---|
The sequence in which Autograding is carried out is as follows:
- The relevant
Moduleis retrieved fromData, followed by theAssignmentwe wish to autograde and the current students in thatModule. - The
Answerfor theAssignmentis read from the corresponding text file in theanswersdirectory and is set or updated in theAssignment. - If the
Assignmentis of typeMcqAssignmentorShortAnswerAssignment, their respectiveautogradeAssignmentmethod will be invoked. Else, theNotAutogradableException()will be thrown. - Within the
autogradeAssignmentmethod, for eachStudentin the student list: 4.1. If the script for theStudentcan be found in thescriptsdirectory, the script is loaded and compared with theAnswer. The grade for theStudentis calculated and saved in theHashMap<String, Float>of students' grades inAssignment. 4.2. Else, grading for theStudentis skipped and the loop continues. - Based on the
HashMap<String, Float>of students' grades, if aStudent's grade isnullfor theAssignment, they are added to the ungraded list. - The students' grades as well as the list of students who have not submitted their work are displayed through
Ui.
The aforementioned sequence of events is also shown in the following sequence diagrams:
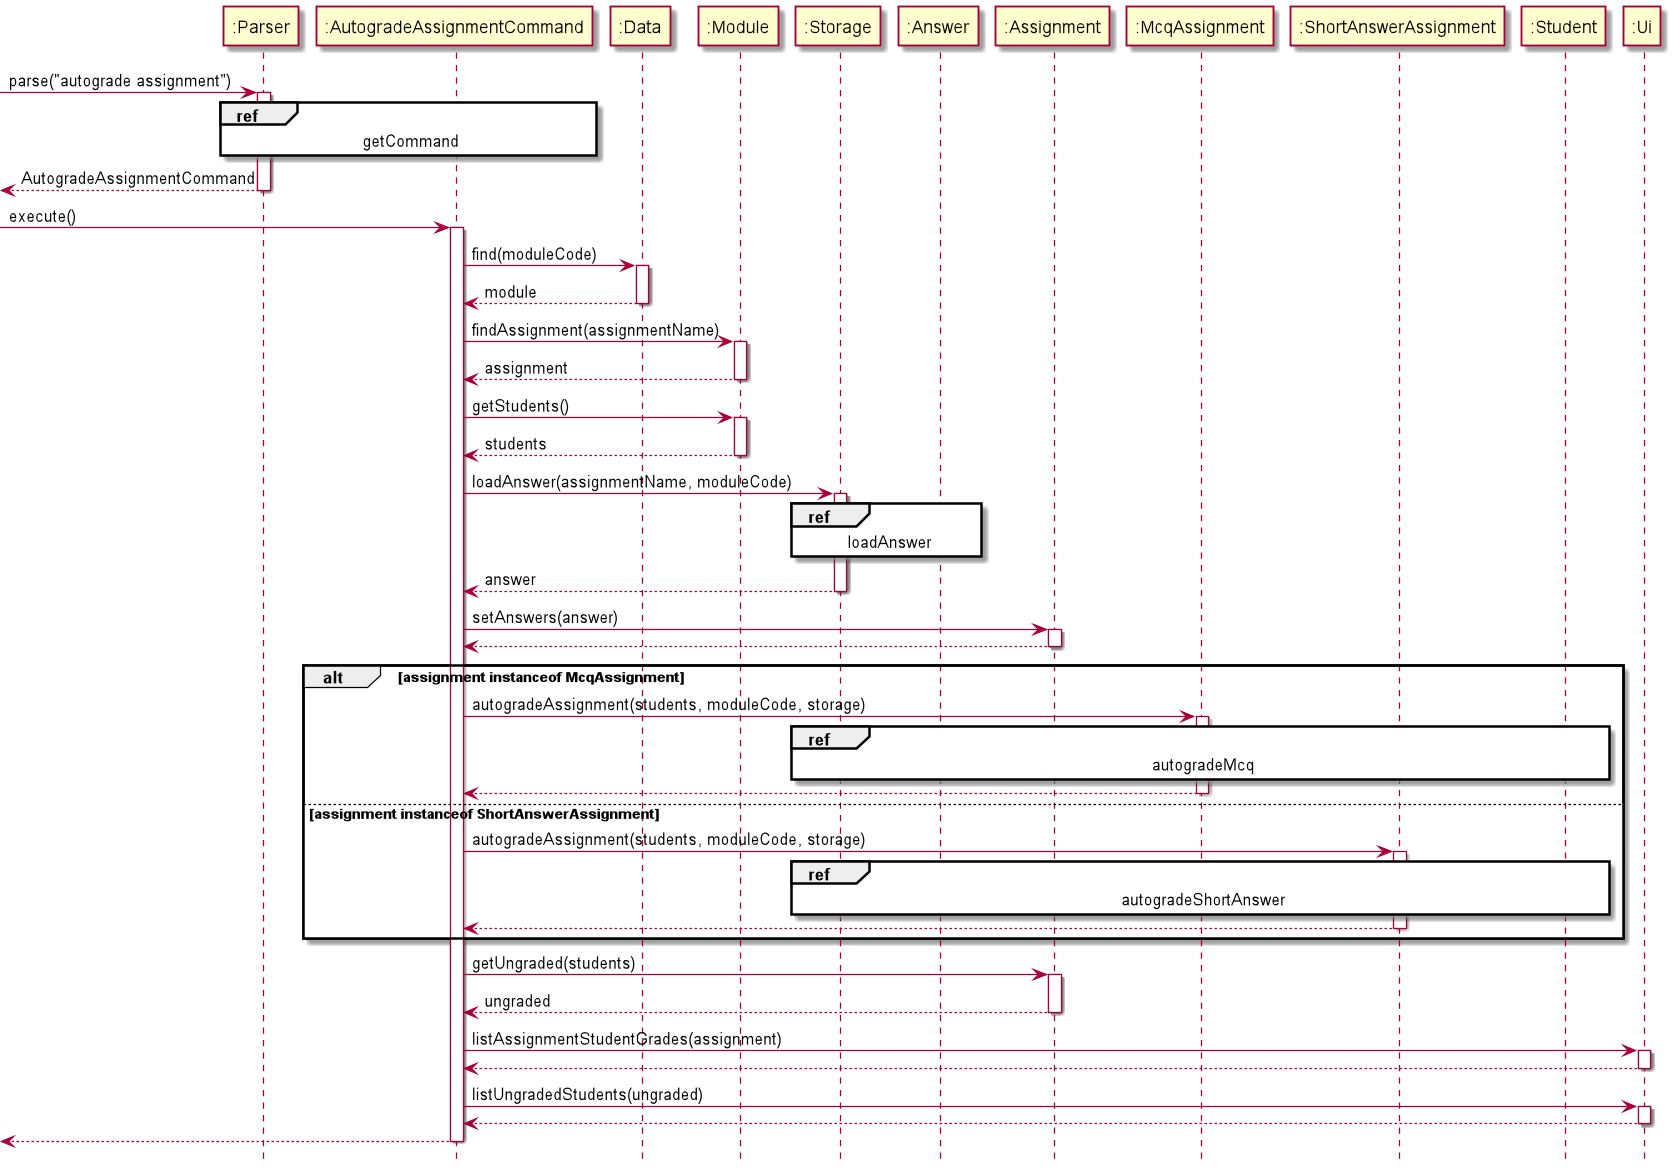
![]() Reference frames for the
Reference frames for the AutogradeAssignmentCommand sequence diagram:
- The
getCommandreference frame can be found in theLogic Componentsection. - The
loadAnswerandloadScriptreference frames can be found in theStorage Componentsection. - Since the
autogradeMcqandautogradeShortAnswerreference frames are similar, onlyautogradeMcqwill be shown below. More details about the difference between autograding for Mcq and Short Answer will be discussed below as well.
Reference frame for autogradeMcq:
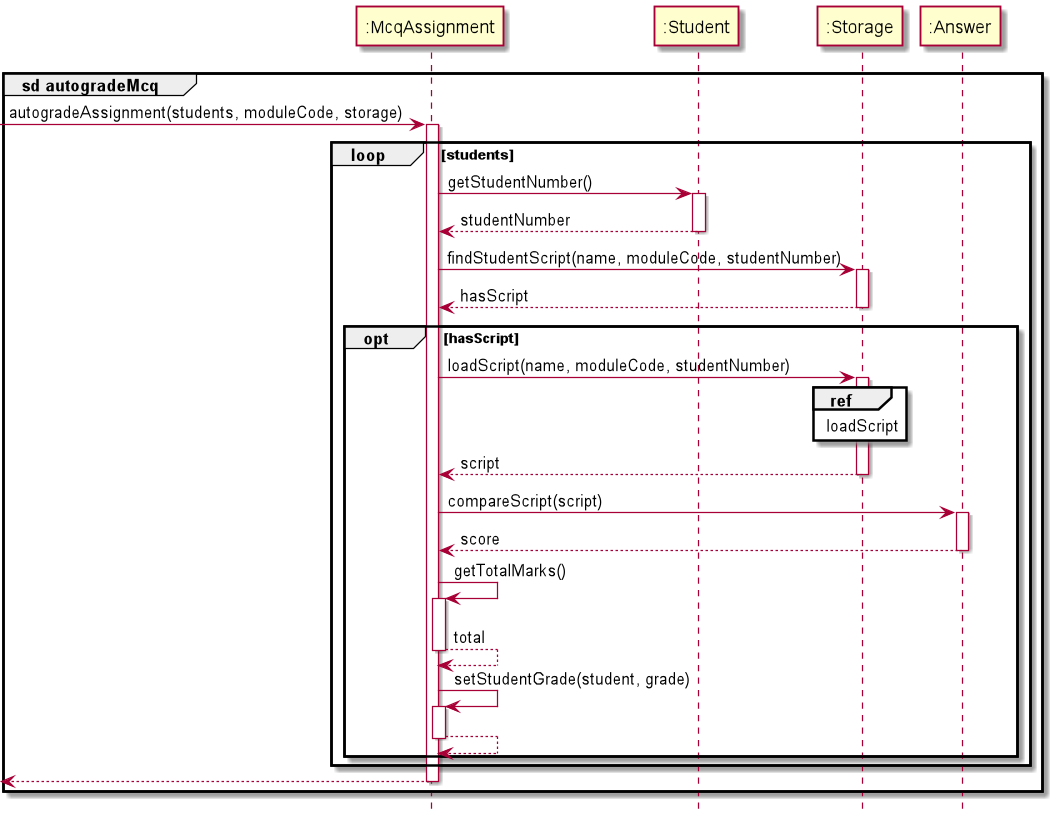
Implementation Considerations in Autograding:
Updating of Answer Key
- The answer key is updated in the
Assignmentevery time anAnsweris read from the text file in theanswersdirectory, even if there was an existingAnswersaved. - This is to account for any changes in the answer key due to changes in grading or more options being accepted.
- By the same principle, all the students' scripts would be graded again as well, even if they had been graded previously.
- The grades for each
Studentwill also be updated in theHashMapaccordingly.
Mcq vs Short Answer
- The answer key for
McqAssignments is limited to the options A through E and 1 to 5 while the answer key forShortAnswerAssignments has no restrictions. - Alternative implementations of using Enumerations for Mcq options were considered.
However, as the students scripts were not stored in the
Assignment, it was redundant to convert the answers read from theanswersdirectory to an enum just to convert it back to a String to be compared with the student's script. - Checking for valid Mcq options are still done when setting or updating the
Answerbefore autograding. If there is an invalid option, theInvalidMcqOptionexception will be thrown.
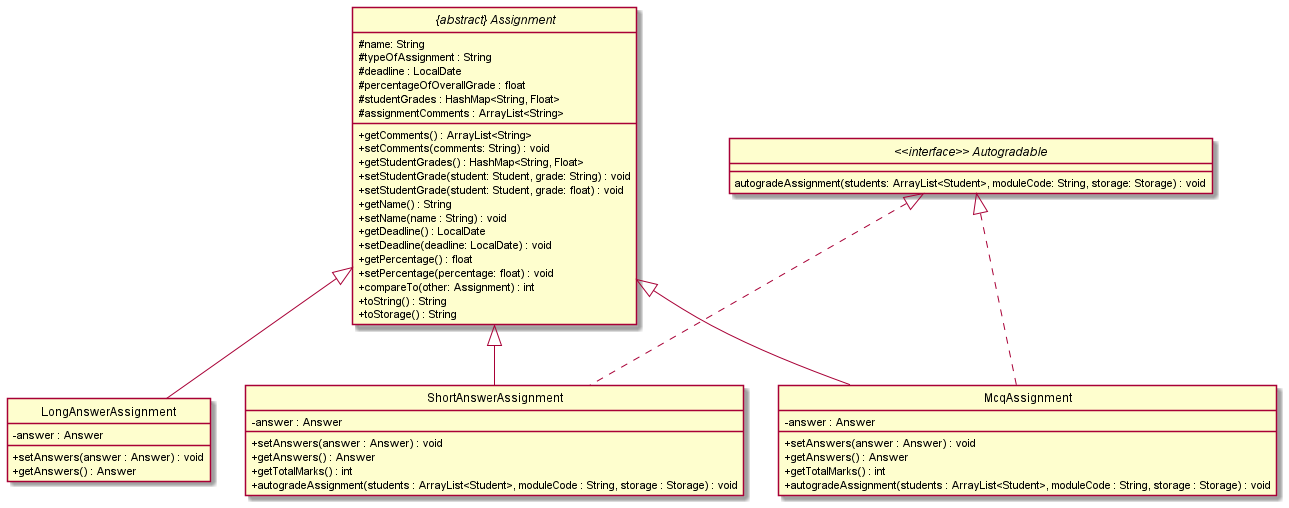
Autogradable Interface
- Currently, only
McqAssignmentandShortAnswerAssignmentimplement theAutogradableInterface. - This is to restrict autograding for assignments with fixed answers and no partial grading.
The Class Diagram for Assignment given below shows all the types of assignments that inherit from Assignment and the ones which implement the Autogradable Interface:
[Coming soon] Get statistics from Autograde
Autograding assignments also generates statistics on how students performed for each question in the assignment.
Adding Lesson to Module Timetable
The AddTimetableCommand is used to add a Lesson to the timetable for the Module selected.
Given below is the sequence diagram for the AddTimetableCommand:
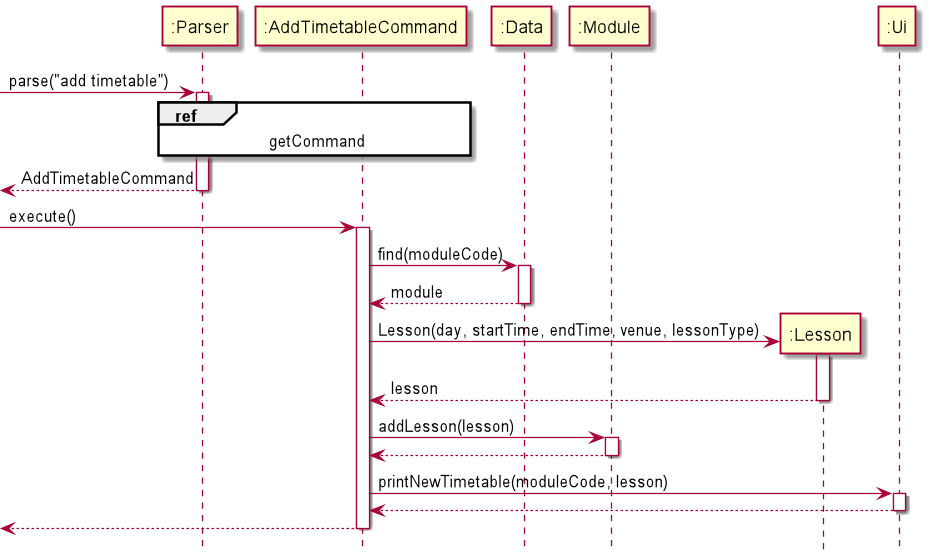
- startTime and endTime passed into the Lesson constructor is of type LocalTime- day is of enumeration type Day
|
|---|
Product scope
Product scope provides you an insight into the value of ModMan, and its benefits for target users.
Target user profile:
- Teaching assistants who:
- have a need to manage their module(s), students, lessons and module assignments
- are comfortable using CLI apps
Value proposition
To keep track of all information pertaining to a module, teaching assistants (at NUS) have to make use of multiple platforms:
- LumiNUS
- NUSMods
- Module websites
- Spreadsheets
With the help of ModMan, users will be able to add, edit, and store all information on one platform, simplifying the process. In addition, features such as autograding and saving comments for assignments will free up time, allowing TAs to focus on teaching!
User Stories
| Version | As a ... | I want to ... | So that I can ... |
|---|---|---|---|
| v1.0 | Teaching Assistant | add modules that I am teaching | keep track of the information for each of my modules |
| v1.0 | Teaching Assistant | add the time and day of a module's lesson | keep track of my teaching timetable |
| v1.0 | Teaching Assistant | add my student's details | contact them if they need help |
| v1.0 | Teaching Assistant | add upcoming module assignments | manage and plan out my schedule easily |
| v2.0 | Teaching Assistant | view my students' grades for each assignment | focus on the students who are not doing well |
| v2.0 | Teaching Assistant | edit a module's lesson information | keep track of changes in lesson schedule |
| v2.0 | Teaching Assistant | sort out assignments by deadline | keep track of the more urgent assignments |
| v2.0 | Teaching Assistant | obtain an overview of information related to a module | easily view my teaching timetable, upcoming assignments and students |
| v2.0 | Teaching Assistant | auto-grade assignments | save time while marking and focus, instead, on teaching! |
| v2.0 | Teaching Assistant | add comments to assignments | refer back to them when other students make the same mistake |
Non-Functional Requirements
- The application should work on any mainstream operating system (e.g. Windows, Linux, macOS)
with
Java 11installed. - The application should be responsive - users should not face any sluggish performance.
- Users who have above average typing speeds (in English) should be able to easily issue commands faster than using a mouse.
- The application should not depend on any remote servers. This means it can be accessed anywhere, without the need for an Internet connection.
Glossary
- Module - Structured unit of study or academic programme that TAs may be involved in.
- Assignment - Work assigned to students that TAs are in charge of tracking, grading or commenting on.
- Autograde - Automatic grading of student assignment scripts against a set answer.
- IDE - Integrated development environment, software applications for software development
Instructions for manual testing
This section provides instructions for testing ModMan manually. You may wish to refer to ModMan's User Guide to find out about the various commands, and their input format.
Initial launch
- Ensure you have Java 11 installed on your computer or install it from here.
- Download the latest
ModMan.jarrelease from here. - Open a command window in the folder containing the
.jarfile. - Run the command
java -jar {filename}.jar
If you haven't changed the filename, run the commandjava -jar ModMan.jar
Sorting Assignments
Ensure you have added a few assignments to be sorted.
Test Case 1: Assignments with different deadlines Expected: Assignments will be sorted with the more urgent deadlines near the top of the list.
Test Case 2: Assignments with the same deadline Expected: Sorting assignments is stable. Assignments with the same deadline will retain the initial order of when they were added to the module.
Test Case 3: Assignments with no deadline Expected: Assignments with no deadline will be sorted after other assignments with valid deadlines. Two assignments both without deadlines will also retain their initial order.
Autograding Assignments
Here are some steps you can take to begin testing the autograde feature:
- Add your students and assignments to the module.
- Add the answer key and student scripts to the respective folders.
- Check if you can load the answer key and student script from ModMan. If it does not load: 3.1 Check if you have added the assignment or student. 3.2 Check if you have named the text files according to the format shown in the User Guide section 2.23
Test Case 1: Answer key question numbers are not in sequential order. Expected: Error message regarding misalignment of question numbers shown.
Test Case 2: Answer key contains non integer question numbers. Expected: Error message regarding invalid question number shown
Test Case 3: Number of questions in answer key and script are different. Expected: Error message regarding misalignment of question numbers shown.
Test Case 4: MCQ assignment has invalid MCQ option. Expected: Error message regarding invalid MCQ option shown.
For more test cases, refer to User Guide section 2.23, 2.25 and 2.26