tp
ModMan User Guide
Introduction
 __  __           _   __  __
|  \/  |         | | |  \/  |
| \  / | ___   __| | | \  / | __ _ _ __
| |\/| |/ _ \ / _  | | |\/| |/ _  |  _ \
| |  | | (_) | (_| | | |  | | (_| | | | |
|_|  |_|\___/ \__'_| |_|  |_|\__'_|_| |_|
ModMan, short for Module Manager, is an all in one platform to help Teaching Assistants (TAs) like yourself manage their modules. Optimized for use via a Command Line Interface (CLI), ModMan allows you to keep track of all your students, assignments and lessons anytime, anywhere! Take advantage of unique features such as autograding and storing comments for assignments, so that you can focus on the more enjoyable parts of being a TA.
What is a CLI?
A command line interface (CLI) is a text-based user interface used to view and manage computer files.
Examples of CLIs include operating system CLIs like the Command Prompt on Windows and the Terminal on macOS. CLIs can be used to run and interact with the ModMan application easily.
About the User Guide
Welcome to the User Guide for ModMan!
This user guide helps you to get started with ModMan by providing you with extensive information about the application. In this user guide, we explain all the commands and functionalities that ModMan supports, allowing you to get familiar with the application.
How to use the User Guide
Here are four main features of the User Guide:
- You may navigate to any subsection from the Table of Contents.
- Scroll down or click here for the Quick Start guide to get started with ModMan.
- The Features section will run you through all the commands that are available in ModMan.
- FAQ and Command Summary are available for quick queries or reference.
Legend
A short description of the icons that are used in this User Guide.
| Icon | Purpose |
|---|---|
| Explainers on how to use and interpret the User Guide | |
| Warnings on usage of ModMan | |
| Tips for Teaching Assistants |
Table of contents
-
Quick start
1.1 Input Formatting
1.2 Database File Tampering -
Features
2.1 Module
2.1.1add module- Adding a Module
2.1.2remove module- Removing a Module
2.1.3select- Selecting a Module
2.1.4current- Viewing Current Module
2.1.5list module- Listing Modules
2.2 Student
2.2.1add student- Adding a Student
2.2.2list student details- Listing Students Details
2.2.3list student- Listing Students in Module
2.3 Timetable
2.3.1add timetable- Adding a Lesson
2.3.2delete timetable- Removing Timetable Lessons
2.3.3edit timetable- Editing a Timetable Lesson
2.3.4list timetable- Listing Timetable Lessons
2.4 Assignment
2.4.1add assignment- Adding an Assignment
2.4.2set assignment deadline- Setting Assignment Deadline
2.4.3set assignment grade- Setting Assignment Grade
2.4.4set assignment percentage- Setting Assignment Percentage of Overall Grade
2.4.5set assignment comments- Setting Assignment Comments
2.4.6get assignment comments- Getting Assignment Comments
2.4.7edit assignment name- Editing an Assignment Name
2.4.8list assignments- Listing Module Assignments
2.4.9sort assignments by deadline- Sorting Module Assignments
2.4.10list assignment grades- Listing Assignment Grades
2.4.11view assignment answer- Viewing Assignment Answers
2.4.12view student script- Viewing Student Script
2.4.13autograde assignment- Auto-Grading Assignments
2.5 Help and Exit
2.5.1help- Listing Basic Commands
2.5.2bye- Exiting ModMan
1. Quick Start
- Ensure you have Java 11 installed on your computer or install it from here.
- Download the latest
ModMan.jarrelease from here. - Open a command window in the folder containing the
.jarfile. - Run the command
java -jar {filename}.jar
If you haven't changed the filename, run the commandjava -jar ModMan.jar
1.1 Input Formatting
This section covers points to note about proper input formats for commands.
- Commands that do not accept any parameters (
help,currentetc.) will display wrong command error if any parameters are entered. - For commands with flags (ie.
/t,/s):- All flags must be entered completely in the order specified in command format.
- There is one whitespace before and after each flag eg.
/t<space>TYPE<space>/v<space>...; Input would be truncated if spaces are not present.-
/t<space>/v...: One space between flags, second flag would not be recognised. -
/t<space><space>/v...: Two spaces between flags, input for flag/twould be parsed as empty. -
.../s 1600/e 1800:START_TIMEwill be parsed as160.
-
- Any inputs within the space between the flags would be trimmed for whitespaces.
-
/t<space><space>Lecture<space><space><space>/v ...: Input for/twill be trimmed toLecture.
-
| Inputs that do not follow this format would be invalid. |
|---|
1.2 Database File Tampering
This section provides a warning for the handling of database for ModMan.
The database of ModMan is stored in the Database.txt file. You should not tamper with the file.If you delete or edit the contents of the Database.txt file such that there are duplicate Module, Student,Lesson or Assignment or introduce any invalid attributes or formatting, the data will likely be corrupted.In such cases, the program will create a new database upon starting. |
|---|
If you delete the whole Database.txt, a new Database.txt would be created for you.
Although not recommended, edits may be made in Database.txt that effects changes in ModMan while still loading those changes in when starting up.
- For example, changing student name of
Studentto another name that does not match any otherStudent.
2. Features
This section provides a comprehensive list of all the features and commands in ModMan. This includes the function of each command, its format, and example of usage.
Inputs in UPPER_CASE are parameters to be supplied by the user. |
|---|
2.1 Module
ModMan allows you to keep track of the modules you are teaching. The commands below allow you to easily add, remove and select a module to work in!
2.1.1 Adding a Module - add module
Adds a new module to the list of modules. If you are a TA for multiple modules, you can keep track of all of them!
Format: add module MODULE_NAME
Example of usage:
add module CS2113T
Expected output:
--------------------------------------------------------------------------
    I have added a new module: CS2113T
--------------------------------------------------------------------------
Input is case sensitive, ie. CS2113T and cs2113T would be considered two different modules |
|---|
2.1.2 Removing a Module - remove module
Removes a module from the list of modules so that you can clear your database when the semester ends!
Format: remove module MODULE_NAME
Example of usage:
remove module CS2113T
Expected output:
--------------------------------------------------------------------------
    You have successfully removed module: CS2113T
--------------------------------------------------------------------------
You can remove the current Module you are working in |
|---|
2.1.3 Selecting a Module - select
Select the module you want to currently work in. Subsequent commands will edit the details of this selected module.
Format: select MODULE_NAME
Example of usage:
select CS2113T
Expected output:
--------------------------------------------------------------------------
    Success! You are now working in: CS2113T
--------------------------------------------------------------------------
| All commands onwards assumes we are working in the module CS2113T |
|---|
2.1.4 Viewing Current Module - current
View the current module you are working in. Also obtain an overview of the module, namely the lessons, assignments, as well as number of students. With this command, you can easily identify which module you are working in!
Format: current
Expected output:
--------------------------------------------------------------------------
    You are currently working in: CS2113T

	Here's an overview of CS2113T
	    - You have not added any lessons yet.

	    - You currently have 0 students in your class

	    - You have not added any assignments to yet.
--------------------------------------------------------------------------
2.1.5 Listing Modules - list module
Lists all the modules you have added, and specifies the current module (if any).
Format: list module
Expected output:
--------------------------------------------------------------------------
    Here are your modules:
	1. CS2113T (current)
--------------------------------------------------------------------------
2.2 Student
As a TA, you would be tasked with assisting and guiding multiple students. ModMan allows you to track their details so that you could easily identify and contact them if needed!
2.2.1 Adding a student - add student
Assigns a new student to the current module you have selected.
Format: add student /s STUDENT_NAME /# STUDENT_NUMBER /e STUDENT_EMAIL
Students with matching STUDENT_NAME, STUDENT_NUMBER or STUDENT_EMAIL cannot be assigned to the same module. |
|---|
Example of usage:
add student /s Bryan Wong /# A0123456Y /e e0123456@u.nus.edu
Expected output:
---------------------------------------------------------------------
    I have assigned a new student to CS2113T:
    Bryan Wong, A0123456Y, e0123456@u.nus.edu
---------------------------------------------------------------------
2.2.2 Listing Students Details - list student details
Lists the details of all students assigned to the current module you have selected.
Format: list student details
Expected output:
--------------------------------------------------------------------------
    Here are the students of all students enrolled in CS2113T:
    1. Bryan Wong, A0123456Y, e0123456@u.nus.edu
--------------------------------------------------------------------------
2.2.3 Listing Students in Module - list student
Lists the names of students assigned to the current module you have selected.
This is slightly different from the list student details command, allowing you to view just the names of the students assigned to a module.
Format: list student
Expected output:
---------------------------------------------------------------------
    Here are the students in CS2113T:
    1. Bryan
---------------------------------------------------------------------
2.3 Timetable
For each module, there would be lesson timings. ModMan helps you to store and manage your timetable so that you would never miss your class!
2.3.1 Adding a Lesson - add timetable
Adds a new lesson to the list (timetable) of lessons for the current module you have selected. You will be able to specify the type of lesson, venue, day and timing.
Format: add timetable /t TYPE /v VENUE /d DAY /s START_TIME /e END_TIME
- The
TYPEandVENUEcan be in a natural language format. - The
DAYmust be a valid day spelt out fully in caps eg.MONDAY. - The
START_TIMEandEND_TIMEmust be in the formatHHmmeg.1800. -
START_TIMEmust be beforeEND_TIME. - The parameters cannot be empty or whitespaces.
- Input
2400forSTART_TIMEandEND_TIMEwould be interpreted as00:00.
Lesson with the exact same parameters as an existing Lesson cannot be added |
|---|
Example of usage:
add timetable /t Lecture /v Zoom /d FRIDAY /s 1600 /e 1800
Expected output:
---------------------------------------------------------------------
    Success! I have added the following timetable for the module - CS2113T
    Lecture: FRIDAY, 16:00-18:00 (Zoom)
---------------------------------------------------------------------
In the above example, the user has added a CS2113T Lecture that will occur on Friday from 4pm to 6pm over Zoom. Notice that
you have to be careful in specifying the Day and 24-hr timing format.
2.3.2 Removing Timetable Lessons - delete timetable
Deletes the lesson in the timetable corresponding to the index, for the current module you have selected.
Format: delete timetable LESSON_INDEX
Example usage:
delete timetable 1
Expected output:
---------------------------------------------------------------------
    You have successfully removed lesson: FRIDAY, 16:00-18:00 from CS2113T
---------------------------------------------------------------------
2.3.3 Editing Timetable Lessons - edit timetable
Edits the lesson in the timetable corresponding to the index, for the current module you have selected.
Format: edit timetable LESSON_INDEX /t TYPE /v VENUE /d DAY /s START_TIME /e END_TIME
- You may enter
-for the field(s) you do not wish to change. - The
TYPEandVENUEcan be in a natural language format. - The
DAYmust be a valid day spelt out fully in caps eg.MONDAY. - The
START_TIMEandEND_TIMEmust be in the formatHHmmeg.1800if specified. -
START_TIMEmust be beforeEND_TIME. - The parameters cannot be empty or whitespaces.
- Input
2400forSTART_TIMEandEND_TIMEwould be interpreted as00:00.
Edited Lesson cannot have the exact same parameters as an existing Lesson
|
|---|
Example of usage:
Changing the day to Monday: edit timetable 1 /t - /v - /d MONDAY /s - /e -
Expected output:
---------------------------------------------------------------------
    You have successfully edited the lesson to:
    Lecture: MONDAY, 16:00-18:00 (Zoom)
---------------------------------------------------------------------
In the example we have used till now, we had added a CS2113T Lecture that will occur on Friday from 4pm to 6pm over Zoom.
The above command can be used to change the day from FRIDAY to MONDAY.
2.3.4 Listing Timetable Lessons - list timetable
Lists the lessons in the timetable for the current module you have selected. The index of each lesson is its numerical order in the list.
Format: list timetable
- The
START_TIMEandEND_TIMEwill be listed in the formatHH:mmeg.18:00.
Expected output:
---------------------------------------------------------------------
    Here are the lessons in CS2113T:
    1. Lecture: FRIDAY, 16:00-18:00 (Zoom)
---------------------------------------------------------------------
2.4 Assignment
As a TA, you may be in charge with grading and keeping track of assignments in the module. ModMan not only lets you manage these assignments, but also lets you autograde them automatically!
2.4.1 Adding an Assignment - add assignment
Adds an assignment to the current module you have selected.
![]() The parameter /t allows for only 3 types of assignment: "la" (which stands for Long Assignments), "sa" (which stands for Short Assignments) and "mcq" (which stands for Multiple Choice Question Assignments).
The parameter /t allows for only 3 types of assignment: "la" (which stands for Long Assignments), "sa" (which stands for Short Assignments) and "mcq" (which stands for Multiple Choice Question Assignments).
Format: add assignment /t TYPE_OF_ASSIGNMENT /a ASSIGNMENT_NAME
Examples of usage:
add assignment /t mcq /a Magic Sequenceadd assignment /t la /a recursion
Expected output:
---------------------------------------------------------------------
    I have added a new assignment to CS2113T:
    Magic Sequence
---------------------------------------------------------------------
2.4.2 Setting Assignment Deadline - set assignment deadline
The set assigment deadline command allows you to set the date to grade the assignment by.
If a deadline had been set previously, the deadline of the assignment will be updated.
Format: set assignment deadline /a ASSIGNMENT_NAME /d DEADLINE
The deadline must be in the format dd MM yyyy e.g. 16 08 2021. You are also restricted to dates between year 2021 and 2030 |
|---|
The deadline has to follow a strict format to allow you to easily sort your assignments by deadline later on!
Examples of usage:
set assignment deadline /a quiz1 /d 16 08 2021
---------------------------------------------------------------------
    I have set quiz1's deadline to Aug 16 2021 in CS2113T
---------------------------------------------------------------------
set assignment deadline /a quiz2 /d 17 08 1999
---------------------------------------------------------------------
    OOPS!!! Date/Time Format is wrong!
    Please re-enter the Date/Time in the following format: dd MM yyyy
    Note that only year 2021 to 2030 is accepted.
---------------------------------------------------------------------
| You can set your own deadlines to be earlier than the actual deadline for grading to help plan your time more wisely! |
|---|
2.4.3 Setting Assignment Grade - set assignment grade
The set assigment grade command allows you to set the grade of a student after you have graded their assignment.
If a grade had been set previously, the grade for the student will be updated.
Format: set assignment grade /a ASSIGNMENT_NAME /s STUDENT_NAME /g GRADE
| The grade must be a percentage within the range 0 to 100. It can also be a decimal number. |
|---|
Examples of usage:
set assignment grade /a quiz1 /s Jianning /g 100
---------------------------------------------------------------------
    I have set Jianning's grade to 100 for assignment quiz1 in CS2113T
---------------------------------------------------------------------
set assignment grade /a quiz1 /s Jianning /g 101
---------------------------------------------------------------------
    OOPS!!! The percentage you entered is invalid! Please provide a percentage value between 0 to 100
---------------------------------------------------------------------
| You can manually set the grades of your students if you prefer a more personal touch compared to autograding |
|---|
2.4.4 Setting Assignment Percentage - set assignment percentage
Sets the assignment weightage of an existing assignment. The percentage can be entered as either a 2-decimal number, 1-decimal number or an integer.
Format: set assignment percentage /a ASSIGNMENT_NAME /p PERCENTAGE
Examples of usage:
set assignment percentage /a Magic Sequence /p 15set assignment percentage /a Forest Fruits /p 25.0
Expected output:
---------------------------------------------------------------------
    I have set Magic Sequence's percentage to 15.0 in CS2113T
---------------------------------------------------------------------
2.4.5 Setting Assignment Comments - set assignment comments
Sets a comment for an existing assignment. The assignment comment cannot exceed 100 characters. ModMan will eventually support comments of unlimited length (we are still working on this feature!).
The editing an assignment's comment feature is still in production. However, you can recreate an edit by calling the get assignment comments command, copy-pasting the result onto your terminal and editing before setting assignment comments again |
|---|
Format: set assignment comments /a ASSIGNMENT_NAME /c COMMENTS
Examples of usage:
set assignment comments /a Magic Sequence /c This assignment is well done.set assignment comments /a Forest Fruits /c Most people did not solve this assignment in full.
Expected output:
---------------------------------------------------------------------
    I have added a comment to Magic Sequence:
        This assignment is well done.
---------------------------------------------------------------------
2.4.6 Getting Assignment Comments - get assignment comments
Retrieves the assignment comments of an existing assignment and prints it out for the user.
Format: get assignment comments /a ASSIGNMENT_NAME
Example of usage:
get assignment comments /a Magic Sequence
Expected output:
---------------------------------------------------------------------
    Your previous comments for Magic Sequence are as follows:
        1. This assignment is well done.
---------------------------------------------------------------------
2.4.7 Editing an Assignment Name - edit assignment name
Edits the assignment name of an existing assignment
Format: edit assignment name /a OLD_ASSIGNMENT_NAME /n NEW_ASSIGNMENT_NAME
Examples of usage:
edit assignment name /a Magic Sequence /n Forest Fruitsedit assignment name /a recursion /n iteration
Expected output:
---------------------------------------------------------------------
    I have updated your assignment name:
    Forest Fruits
---------------------------------------------------------------------
2.4.8 Listing Module Assignments - list assignments
The list assignments command lists out all the assignments in the current module you are working in. It also shows you information on the type of assignment
and the due date for grading, if you have set a deadline for the assignment.
If you have executed the sort assignments by deadline command, the assignments will be listed in order from the most to least urgent.
Otherwise, the assignments will be listed in the order it was added. (more details on sorting assignments will be provided in section 2.4.9 sort assignments by deadline)
Format: list assignments
Example of usage:
Let's say you have added 3 assignments to the module CS2113T and set the deadline for the first two quizzes.
Executing the list assignments command will show you an expected output as shown below.
Expected output:
---------------------------------------------------------------------
    Here are the assignments in CS2113T:
    1. quiz1 (McqAssignment) due by: Aug 17 2021
    2. quiz2 (ShortAnswerAssignment) due by: Aug 16 2021
    3. quiz3 (LongAnswerAssignment) - due date not specified.
---------------------------------------------------------------------
Assignments with no deadline set will output due date not specified
|
|---|
2.4.9 Sorting Module Assignments - sort assignments by deadline
The sort assignment by deadline command sorts and lists the assignments in your current module by deadline, allowing you to easily keep track of which assignments have to be graded soon.
The assignments are sorted based on the urgency of the grading from the most urgent to the least urgent.
Here are some special cases to consider when sorting assignments:
- If an assignment does not have a deadline, it will be sorted after other assignments with valid deadlines.
- If two assignments have the same deadline or both do not have a deadline set, they will retain the initial order of when they were added to the module.
| You can set your own deadlines to be earlier than the actual deadline for grading to help plan your time more wisely! |
|---|
Format: sort assignments by deadline
Here is an example of the order of assignments before and after sorting:
Before sorting:
---------------------------------------------------------------------
    Here are the assignments in CS2113T:
    1. quiz1 (McqAssignment) - due date not specified.
    2. quiz2 (ShortAnswerAssignment) due by: Aug 17 2021
    3. quiz3 (LongAnswerAssignment) due by: Aug 16 2021
---------------------------------------------------------------------
After sorting:
---------------------------------------------------------------------
    Here are the assignments in CS2113T:
    1. quiz3 (LongAnswerAssignment) due by: Aug 16 2021
    2. quiz2 (ShortAnswerAssignment) due by: Aug 17 2021
    3. quiz1 (McqAssignment) - due date not specified.
---------------------------------------------------------------------
2.4.10 Listing Assignment Grades - list assignment grades
Lists the students' grades for a particular assignment.
Format: list assignment grades /a ASSIGNMENT_NAME
Examples of usage:
list assignment grades /a quiz1list assignment grades /a quiz3
Expected output:
---------------------------------------------------------------------
    Here are the students' grades for the quiz1 assignment:
    1. A0214561M - 100.0
    2. A0215114X - 101.0
---------------------------------------------------------------------
2.4.11 Viewing Assignment Answer - view assignment answer
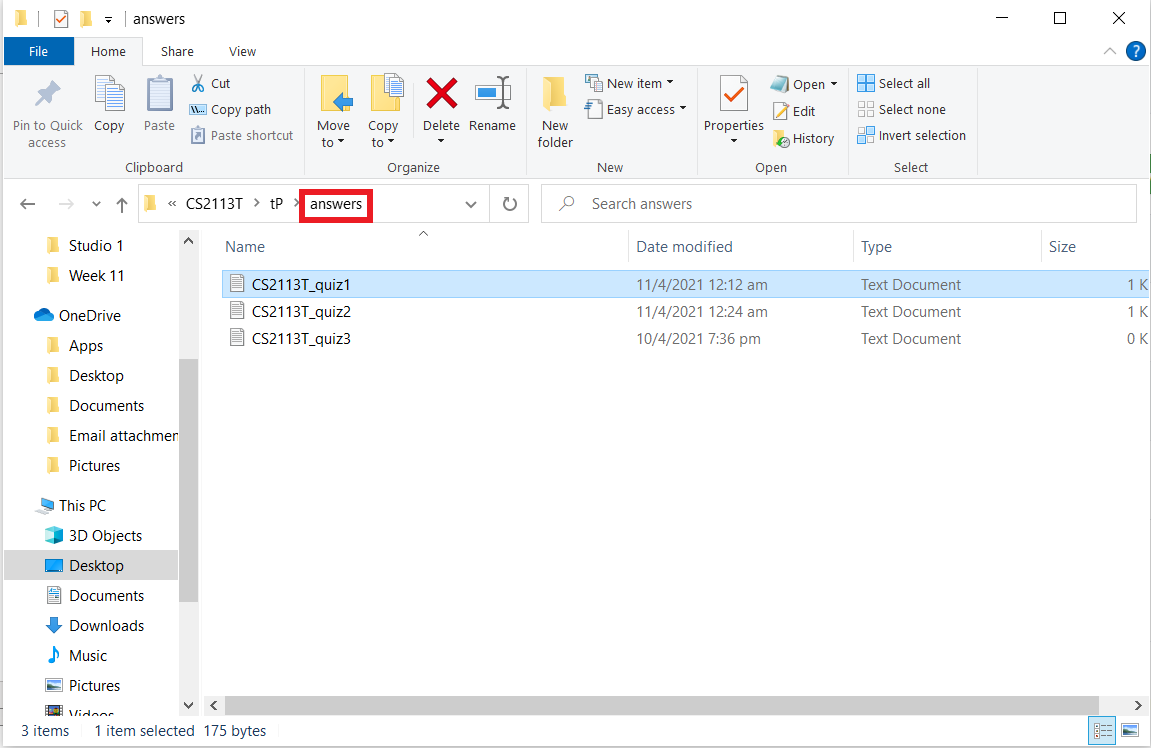
The view assignment answer command allows you to easily search and retrieve the answer key for an assignment just by entering the name of the assignment.
Answers are stored as text files in the answers folder which can be found in the same working directory as the ModMan app.
Naming of the answer text file has to be in the format <ModuleCode>_<AssignmentName>.txt for our system to be able to automatically retrieve the answers for you |
|---|
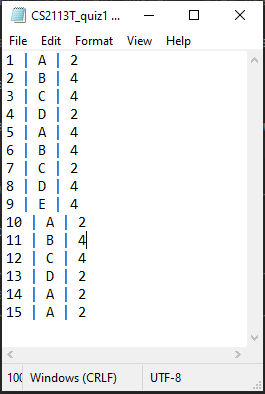
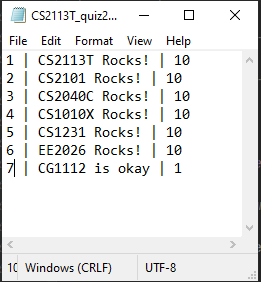
Within the text file, the answer for each question should also follow the format <QUESTION_NUMBER> | <ANSWER> | <MARKS> whereby:
- The first column contains the question number
- The second column contains the answer for the corresponding question
- The third column contains the marks for getting that question correct
Shown below are examples of what the answer text file for an assignment should look like: On the left, we have the answer key for an MCQ assignment quiz1. On the right, we have the answer key for a Short Answer assignment quiz2.
![]() Here are some things to look out for when editing the answer text file:
Here are some things to look out for when editing the answer text file:
- Question numbers should be in sequential order starting from 1
- Answers for MCQ assignments should only include options A to E or 1 to 5
- Answers for Short Answer and Long Answer assignments should not exceed 100 characters long
- Marks should have non-negative integer values
- Ensure that the delimiter
|is not used in the answer
Format: view assignment answer /a ASSIGNMENT_NAME
Example of usage:
Let's say you want to view the answer key to quiz1 shown above on the left.
The command view assignment answer /a quiz1 quickly searches through the answers folder to display the answer key in the format <QUESTION_NUMBER>. <ANSWER> | [<MARKS>].
The expected output below shows what it would look like in the app.
Expected output:
---------------------------------------------------------------------
    Answer key for quiz1:
    1. A | [2]
    2. B | [4]
    3. C | [4]
    4. D | [2]
    5. A | [4]
    6. B | [4]
    7. C | [2]
    8. D | [4]
    9. E | [4]
    10. A | [2]
    11. B | [4]
    12. C | [4]
    13. D | [2]
    14. A | [2]
    15. A | [2]
---------------------------------------------------------------------
| You can open up the student script in another terminal so that you can view both the answer key and student script side by side! |
|---|
2.4.12 Viewing Student Script - view student script
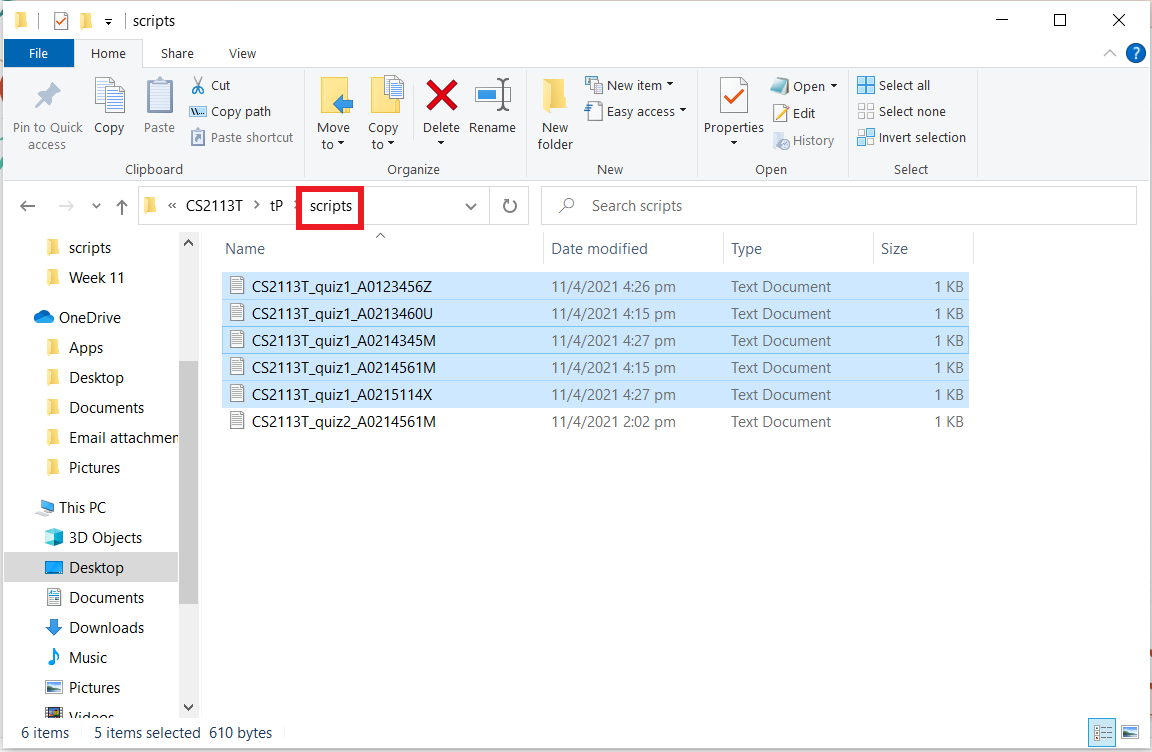
The view student script command allows you to easily search and retrieve the student's script for an assignment just by entering the name of the assignment and the student.
Scripts are stored as text files in the scripts folder which can be found in the same working directory as the ModMan app.
Naming of the script text file has to be in the format <ModuleCode>_<AssignmentName>_<MatricNumber>\.txt for our system to be able to automatically retrieve the script for you |
|---|
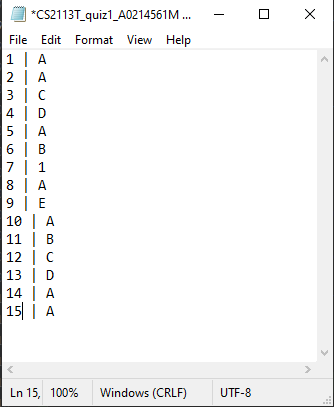
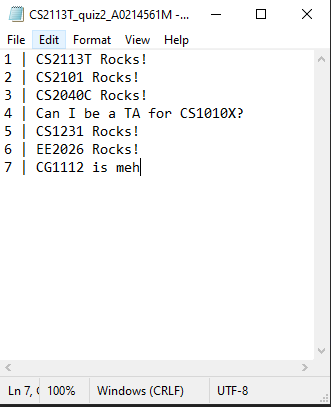
Within the text file, the answer for each question should also follow the format <QUESTION_NUMBER> | <ANSWER> whereby:
- The first column contains the question number
- The second column contains the student's answer for the corresponding question
Shown below are examples of what a student's script text file for an assignment should look like: On the left, we have the script for an MCQ assignment quiz1. On the right, we have the script for a Short Answer assignment quiz2.
![]() Here are some things to look out for when formatting the script text file:
Here are some things to look out for when formatting the script text file:
- Question numbers should be in sequential order starting from 1
- Answers for all assignment types should not exceed 100 characters long
- Ensure that the delimiter
|is not used in the answer
Format: view student script /a ASSIGNMENT_NAME /s STUDENT_NAME
Example of usage:
Let's say you want to view your student Jianning's script for quiz1.
The command view student script /a Jianning quickly searches through the scripts folder by matching the student name with their matric number.
The script is then displayed in the format <QUESTION_NUMBER>. <ANSWER> for each question in the assignment.
The expected output below shows what it would look like in the app.
Expected output:
---------------------------------------------------------------------
    Jianning(A0214561M)'s script for quiz1
    1. A
    2. A
    3. C
    4. D
    5. A
    6. B
    7. 1
    8. A
    9. E
    10. A
    11. B
    12. C
    13. D
    14. A
---------------------------------------------------------------------
| You can open up the answer key in another terminal so that you can view both the answer key and student script side by side! |
|---|
2.4.13 Autograding Assignments - autograde assignment
ModMan has an integrated autograder to help you grade digital assignment submissions easily and efficiently!
The key features of autograding are as follows:
- All the students' scripts for that assignment found in the
scriptsfolder will be graded. - The grades for each student will be listed out for you and automatically saved in the database.
- Keeps track of which of your students have not submitted their work.
| Currently, only MCQ and Short Answer assignments can be autograded |
|---|
Format: autograde assignment /a ASSIGNMENT_NAME
Example of usage:
Let's say you are currently teaching 10 students in CS2113T and the deadline for students to submit their quiz1 MCQ assignment was yesterday. The following 3 steps are all you need to autograde all your students'assignments:
- Copy and Paste the answer key for quiz1 into the
answersfolder found in the same working directory as the ModMan app.
- Copy and Paste the students' scripts for quiz1 into the
scriptsfolder found in the same working directory as the ModMan app.
- Execute the command
autograde assignment /a quiz1
Expected output:
---------------------------------------------------------------------
    Here are the students' grades for the quiz1 assignment:
    1. A0214561M - 78.26087
    2. A0215114X - 100.0
    3. A0213460U - 78.26087
    4. A0123456Z - 86.95652
    5. A0214345M - 82.608696
    These are the students who have not submitted their assignments:
    1. Naughty, A1111111A, e1111111@u.nus.edu
    2. Mischievous, A2222222A, e2222222@u.nus.edu
    3. Playful, A3333333A, e3333333@u.nus.edu
    4. Tardy, A4444444A, e4444444@u.nus.edu
    5. Bad Boy, A5555555A, e5555555@u.nus.edu
---------------------------------------------------------------------
| Answers for MCQ assignments are limited to the options A to E or 1 to 5Answers fpr Short Answer Assignments are limited to 100 characters. |
|---|
2.5 Help and Exit
2.5.1 Listing Basic Commands - help
This command is available for you to get a quick reference of all the basic commands available in ModMan, and their usages.
You can invoke help any time you are unsure of the basic commands and their formats.
Format: help
Expected output:
--------------------------------------------------------------------------
    Here are the list of basic commands you can use:

	1. Adding a Module: add module MODULE_NAME
	2. Selecting a Module: select MODULE_NAME
	3. Viewing Current Module: current
	4. Adding a student: add student /s STUDENT_NAME /# STUDENT_NUMBER /e STUDENT_EMAIL
	5. Adding a Lesson: add timetable /t TYPE /v VENUE /d DAY /s START_TIME /e END_TIME
	6. Adding an Assignment: add assignment /t TYPE_OF_ASSIGNMENT /a ASSIGNMENT_NAME
	7. Setting Assignment Deadline: set assignment deadline /a ASSIGNMENT_NAME /d DEADLINE
	8. Auto-Grading Assignments: autograde /a ASSIGNMENT_NAME
	9. Setting Assignment Comments: set assignment comments /a ASSIGNMENT_NAME /c COMMENT
	10. Exiting ModMan: bye

    For the full list of commands, check out the User Guide at: https://ay2021s2-cs2113t-f08-1.github.io/tp/UserGuide.html

--------------------------------------------------------------------------
Please note that it does not display the full list of commands (due to there being so many!). You may open this User Guide for a comprehensive list.
2.5.2 Exiting ModMan - bye
Auto-saves all your changes and exits the program. ModMan will have all your data ready the next time you load it.
Format: bye
Expected output:
---------------------------------------------------------------------
    Bye. Hope to see you again soon!
---------------------------------------------------------------------
3. FAQ
Q: How do I transfer my data onto another computer?
A: Navigate to where the ModMan jar file is located and identify the Database folder. Copy this Database folder along with the ModMan jar file over to your other computer and place them in an empty folder. You're now good to go to start accessing your data on your new computer!
Q: When is the data saved to the database?
A: Your data is only saved when you exit the program using the bye command. So always remember to say goodbye to ModMan!
Q: How do I delete a particular student/assignment?
A: The delete feature for students and assignments are currently still work in progress but will be released in our upcoming version soon.
Q: How are the three assignment types different?
A: ModMan currently allows you to add three types of assignments - MCQ, Short Answer and Long Answer.
MCQ assignments only allow for options A to E or 1 to 5 as answers while Short Answer and Long Answer assignments only have a 100 character limit for answers.
MCQ and Short Answer assignments are autogradable as they have fixed answers and grading schemes while Long Answer assignments are open-ended and allow for flexible grading.
Q: How do I add the answer key and students' scripts for grading?
A: You can simply copy and paste the answer key and student scripts into the respective folders in the working directory of ModMan named answers and scripts.
You can refer to sections 2.4.11 and 2.4.12 for more details on the format of the answer key and student script text files.
Q: How do I report a bug or give feedback for the application?
A: You are welcome to raise a new issue here on our project repository. Do include as much detail as you can on the bug along with any screenshots on how you came across the problem. We also look forward to hearing from you if you have any suggestions to improve our app!
4. Command Summary
Module Commands:
| Action | Format, Examples |
|---|---|
| add module |
add module MODULE_NAME e.g. add module CS2113T
|
| remove module |
remove module MODULE_NAME e.g. remove module CS2113T
|
| select module |
select MODULE_NAME e.g. select CS2113T
|
| view current module |
current |
| list module |
list module |
Student Commands:
| Action | Format, Examples |
|---|---|
| add student |
add student /s STUDENT_NAME /# STUDENT_NUMBER /e STUDENT_EMAIL e.g. add student /s John Doe /# A0123456Y /e e0123456@u.nus.edu
|
| list student details |
list student details |
| list student |
list student |
Timetable Commands:
| Action | Format, Examples |
|---|---|
| add timetable |
add timetable /t TYPE /v VENUE /d DAY /s START_TIME /e END_TIME e.g. add timetable /t Lecture /v Zoom /d FRIDAY /s 1600 /e 1800
|
| delete timetable |
delete timetable LESSON_INDEX e.g. delete timetable 1
|
| edit timetable |
edit timetable LESSON_INDEX /t TYPE /v VENUE /d DAY /s START_TIME /e END_TIME e.g. edit timetable 1 /t - /v COM2 /d - /s 1600 /e 1800
|
| list timetable |
list timetable |
Assignment Commands:
| Action | Format, Examples |
|---|---|
| add assignment |
add assignment /t TYPE_OF_ASSIGNMENT /a ASSIGNMENT_NAME e.g. add assignment /t mcq /a Magic Sequence
|
| set assignment deadline |
set assignment deadline /a ASSIGNMENT_NAME /d DEADLINE e.g. set assignment deadline /a quiz1 /d 17 08 2021
|
| set assignment grade |
set assignment grade /a ASSIGNMENT_NAME /s STUDENT_NAME /g GRADE e.g. set assignment grade /a quiz1 /s Jianning /g 100
|
| set assignment percentage |
set assignment percentage /a ASSIGNMENT_NAME /p PERCENTAGE e.g. set assignment percentage /a Magic Sequence /p 15
|
| set assignment comments |
set assignment comments /a ASSIGNMENT_NAME /c COMMENTS e.g. set assignment comments /a Magic Sequence /p This assignment is well done.
|
| get assignment comments |
get assignment comments /a ASSIGNMENT_NAME e.g. get assignment comments /a Magic Sequence
|
| edit assignment name |
edit assignment name /a OLD_ASSIGNMENT_NAME /n NEW_ASSIGNMENT_NAME e.g. edit assignment /t mcq /a Magic Sequence /n Forest Fruits
|
| list assignments |
list assignments |
| sort assignments by deadline |
sort assignments by deadline |
| list assignment grades |
list assignment grades /a ASSIGNMENT_NAME e.g. list assignment grades /a quiz1
|
| view assignment answer |
view assignment answer /a ASSIGNMENT_NAME e.g. view assignment answer /a quiz1
|
| view student script |
view student script /a ASSIGNMENT_NAME /s STUDENT_NAME e.g. view student script /a quiz1 /s Jianning
|
| autograde assignment |
autograde assignment /a ASSIGNMENT_NAME e.g. autograde assignment /a quiz1
|
Help and Exit Commands:
| Action | Format |
|---|---|
| help |
help |
| bye |
bye |